Smart Door Lock using RFID and Fingerprint with IoT integration is a powerful security solution designed for modern homes and offices. Unlike traditional key-based locks that can be lost, stolen, or duplicated, this DIY smart door lock project combines RFID authentication, fingerprint biometrics, and IoT connectivity to provide advanced, reliable, and convenient access control. With this system, you can unlock doors using RFID cards, fingerprints, or remotely through an IoT mobile app. It not only improves security but also offers real-time monitoring, notifications, and user management—making it an ultimate choice for smart home automation.
Introduction to Smart Door Lock:
The Smart Door Lock is an electronic access system that replaces physical keys with digital authentication methods. The lock can be operated in three ways:
-
RFID Access – Authorized users can unlock the door using RFID cards or tags.
-
Fingerprint Authentication – Provides secure biometric verification for unique access.
-
IoT Connectivity – Enables remote monitoring, real-time alerts, and user management through a mobile app.
By combining these technologies, the system ensures enhanced protection against unauthorized entry.
Features of Smart Door Lock System Using Arduino:
-
-
Multi-authentication: Access through RFID, fingerprint, or IoT app.
-
Real-time IoT alerts: Remote notifications via Blynk or Firebase.
-
Secure logging: Tracks who entered and at what time.
-
Local indicators: LED and buzzer feedback for valid or invalid access.
-
Affordable design: Built using Arduino/ESP microcontrollers.
-
Components Needed for Smart Door Lock System:
Arduino Mega 2560
-
- Chosen for its ample I/O pins and memory to handle TFT, audio, and RTC simultaneously.
2.4” TFT Touchscreen Display (ILI9341)
-
- Used to display real-time clock, prayer times, and control interface.
DS3231 RTC Module
-
- Real-Time Clock for accurate timekeeping with battery backup.
DFPlayer Mini MP3 Player Module
-
- Plays pre-recorded Azan audio files stored on a microSD card.
MicroSD Card (FAT32 formatted)
-
- Stores the Azan MP3 files.
4Ω 3W Speaker
-
- Connected to DFPlayer Mini to play audio.
Optional: Buttons or Buzzer (for notifications or manual control)
Breadboard & Jumper Wires / Custom PCB
-
- For wiring and prototyping.
Power Supply (USB Adapter / 9V Battery / 5V Adapter)
Working of Smart Door Lock System
-
User attempts access by either scanning an RFID card or placing a finger on the fingerprint sensor.
-
Arduino/ESP32 verifies credentials by comparing the data with stored records.
-
If access is authorized:
-
The servo/solenoid lock activates and unlocks the door.
-
A success notification is sent via IoT (Blynk app).
-
LED indicator shows green, buzzer beeps shortly.
-
-
If access is unauthorized:
-
The lock remains closed.
-
A red LED lights up and buzzer sounds.
-
IoT platform sends an instant alert notification.
-
-
Admin panel on IoT app allows remote access control, user management, and monitoring of entry logs.
IoT Platform Setup for Smart Door Lock
You will need:
-
A Blynk account (https://blynk.io/)
-
Create a template and device on the dashboard
-
Copy the auth token into Arduino code
-
Assign virtual pins for:
-
V0 = Access Status
-
V1 = Door Lock/Unlock Control
-
V2 = User Log Data
-
This setup enables real-time remote control and monitoring.
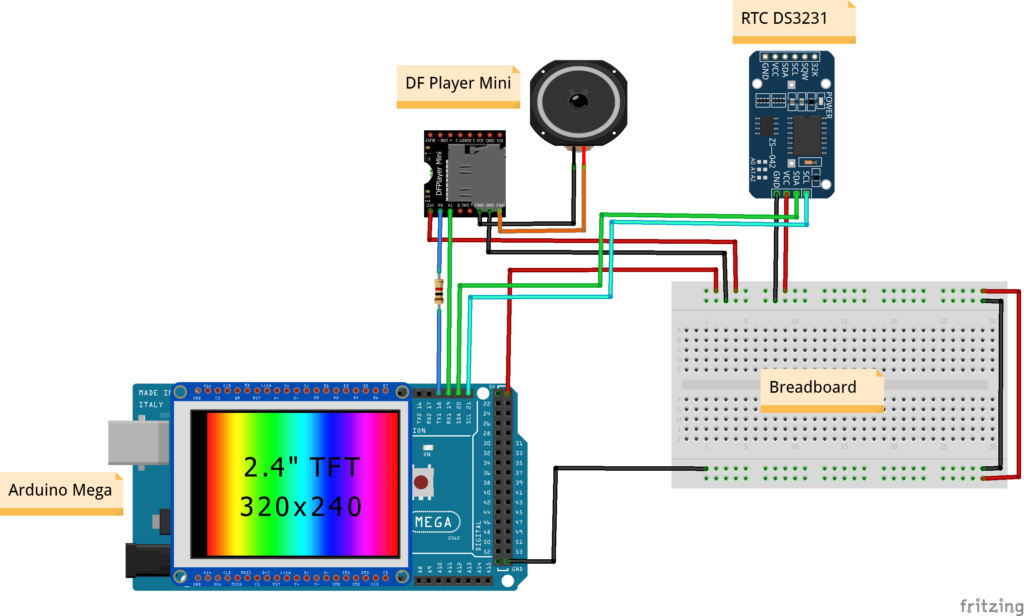
Circuit Diagram of Smart Door Lock:
Code for Smart Door Lock:
/***************************************************
   Smart Door Lock System (RFID + Fingerprint + IoT)
   Components: Arduino UNO/ESP32, RC522 RFID, R307 Fingerprint,
               Servo Motor, Buzzer, LEDs, Blynk IoT
****************************************************/

#include <SPI.h>
#include <MFRC522.h>              // RFID Library
#include <Adafruit_Fingerprint.h> // Fingerprint Sensor Library
#include <Servo.h>
#include <WiFi.h>                 // Use <ESP8266WiFi.h> if ESP8266
#include <BlynkSimpleEsp32.h>     // Blynk for ESP32 (change for ESP8266)

// -------- WiFi & Blynk Setup --------
char auth[] = "YOUR_BLYNK_AUTH_TOKEN"; // Get from Blynk app
char ssid[] = "YOUR_WIFI_SSID";        // WiFi name
char pass[] = "YOUR_WIFI_PASSWORD";    // WiFi password

// -------- RFID Setup --------
#define SS_PIN  5
#define RST_PIN 0
MFRC522 rfid(SS_PIN, RST_PIN);

// -------- Fingerprint Setup --------
Adafruit_Fingerprint finger = Adafruit_Fingerprint(&Serial2);
// Use Serial1/Serial2 depending on ESP32 pins used

// -------- Servo & Buzzer --------
Servo doorServo;
#define SERVO_PIN 4
#define BUZZER_PIN 15
#define LED_GREEN 2
#define LED_RED   14

// -------- Variables --------
bool doorUnlocked = false;

// -------- Setup --------
void setup() {
  Serial.begin(115200);

  // RFID init
  SPI.begin();
  rfid.PCD_Init();

  // Fingerprint init
  finger.begin(57600);
  if (finger.verifyPassword()) {
    Serial.println("Fingerprint sensor ready.");
  } else {
    Serial.println("Fingerprint sensor not found!");
    while (1) delay(1);
  }

  // Servo + buzzer + LEDs
  doorServo.attach(SERVO_PIN);
  pinMode(BUZZER_PIN, OUTPUT);
  pinMode(LED_GREEN, OUTPUT);
  pinMode(LED_RED, OUTPUT);
  lockDoor();

  // WiFi + Blynk
  Blynk.begin(auth, ssid, pass);
  Serial.println("System Initialized - Smart Door Lock Ready");
}

// -------- Main Loop --------
void loop() {
  Blynk.run();
  checkRFID();
  checkFingerprint();
}

// -------- RFID Function --------
void checkRFID() {
  if (!rfid.PICC_IsNewCardPresent() || !rfid.PICC_ReadCardSerial()) return;

  String tagID = "";
  for (byte i = 0; i < rfid.uid.size; i++) {
    tagID += String(rfid.uid.uidByte[i], HEX);
  }
  tagID.toUpperCase();

  Serial.print("RFID Tag Scanned: ");
  Serial.println(tagID);

  // Change with your authorized card UID
  if (tagID == "YOUR_AUTHORIZED_CARD_ID") {
    unlockDoor("RFID Access");
  } else {
    denyAccess();
  }
  rfid.PICC_HaltA();
}

// -------- Fingerprint Function --------
void checkFingerprint() {
  int id = getFingerprintID();
  if (id >= 0) {
    unlockDoor("Fingerprint Access");
  }
}

int getFingerprintID() {
  finger.getImage();
  if (finger.image2Tz() != FINGERPRINT_OK) return -1;
  if (finger.fingerSearch() != FINGERPRINT_OK) return -1;
  Serial.print("Fingerprint ID: "); Serial.println(finger.fingerID);
  return finger.fingerID;
}

// -------- Unlock & Lock Functions --------
void unlockDoor(String method) {
  doorServo.write(90); // rotate to unlock
  digitalWrite(LED_GREEN, HIGH);
  digitalWrite(BUZZER_PIN, HIGH);
  delay(300);
  digitalWrite(BUZZER_PIN, LOW);
  Blynk.virtualWrite(V0, "Door Unlocked via " + method);
  Serial.println("Door Unlocked via " + method);
  delay(5000); // Keep unlocked for 5 sec
  lockDoor();
}

void lockDoor() {
  doorServo.write(0); // rotate to lock
  digitalWrite(LED_GREEN, LOW);
  digitalWrite(LED_RED, HIGH);
  doorUnlocked = false;
  Blynk.virtualWrite(V0, "Door Locked");
  Serial.println("Door Locked");
}

void denyAccess() {
  digitalWrite(LED_RED, HIGH);
  digitalWrite(BUZZER_PIN, HIGH);
  delay(1000);
  digitalWrite(BUZZER_PIN, LOW);
  Blynk.virtualWrite(V0, "Unauthorized Access Attempt");
  Serial.println("Access Denied!");
}
Applications of Smart Door Lock System
-
Home Security – Keyless entry for residents and remote access for guests.
-
Office & Workspaces – Manage employee access and maintain logs.
-
Apartments & Hostels – Provide centralized access control.
-
Server Rooms/Labs – Restrict access to sensitive areas.
-
Hotels & Rentals – IoT-enabled guest access without physical keys.
Future Improvements
-
-
Integration with Face Recognition for advanced security.
-
Compatibility with Google Assistant / Alexa for voice commands.
-
Battery backup for uninterrupted operation during power failures.
-
Two-factor authentication (RFID + Fingerprint) for maximum safety.
-
Need This Project?
If you need this Project with or without Modifications or Customization then you can contact us through WhatsApp. We can deliver you this Project in the Following Ways.
Project Code:
we can provide you Project Code along with Zoom Assistant, through Zoom meeting for Setup of this Project or any other Arduino Project of your need.
Fully Functional Project with Hardware/Components Shipment:
if you can not make this project yourself then you can use this option. We will assemble the Project and will ship it to your Doorstep with Safe Packaging.
Learn More about the services we offer.